TM 1-4220-250-12&P
4.8.4
Repair Inflation Assembly.
This task covers: a Repair
b. Remove
c. Install
INITIAL SET UP
Tools/Equipment
Valve, Inflation,
Aircraft General Mechanic Tool Kit
Type II
MIL-I-23145
Torque Wrench 0-1 50 inch lbs.
Abrasive Mat
(D5)
Corrosion Preventive
Materials/Parts
Compound (Aimguard) Type I (D6)
Thread, Nylon
(D19)
Lubricant, Silicone
(D16)
Kit, Gasket
105AS100-5
1.
Repair of C02 Inflation Valve. To repair theC02
inflation valve, proceed as follows. See Figures 4-2
and 4-3.
a.
Remove C02 cylinder from valve assembly by
removing
and
discarding
ordnance
tape.
Ensure set screw is loose so as not to damage
C02 cylinder threads.
NOTE
Do not descard set screw
b.
Remove C02 cylinder from valve. Remove
inflator cap nut and inflation valve from the raft.
Discard the two gaskets on the valve stem.
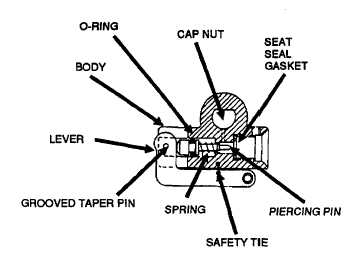
Figure
4-2.
CO2
Inflation
Assembly.
c.
Remove grooved taper pin (retaining lever)
from inflation valve, using awl and mallet. See
Figure 4-2.
d.
Remove lever, spring, and piercing pin.
e.
If spring is broken or corroded, replace entire
valve, in accordance with paragraph 4.6.2.
f.
If piercing pin or actuating lever is corroded,
remove corrosion with the 240 grit emery cloth
(D5). Do not damage 0-ring on piercing pin.
Wipe off any dirt or moisture from actuating
lever and apply a thin coat of corrosion
preventive compound (D6) and allow to dry.
g.
Clean residue from actuating lever on piercing
pin. Lightly coat base of piercing pin with
silicone lubricant (D16).
h.
Reassemble
inflation
valve
and
operate
actuating lever three or four times. Ensure that
lever and piercing pin move freely.
i.
If piercing pin and lever do not move freely,
replace entire valve, in accordance with
paragraph 4.6.2.
GO NEXT PAGE
4-20