TM 10-3530-207-14
2-15. OPERATING PROCEDURES FOR TACK-BUTTON ATTACHING MACHINE - continued
b.
Adjusting Pinch.
Use and insert sample testing material in the tack-button attaching machine and adjust the pinch as
follows:
(1)
Turn the screw in the base of the machine to obtain the proper pinch on the material. Adjust the
pinch until the button is just tight on the material. Test the pinch by operating the tack-button
attaching machine.
CAUTION
If the pinch is too tight, the material will be cut.
(2)
Tighten the lower die screw holding the lower die in the machine when the pinch has been
adjusted properly.
c.
Operating the Tack-Button Attaching Machine.
After the tack-button-attaching machine has been prepared for operation, operate it as follows:
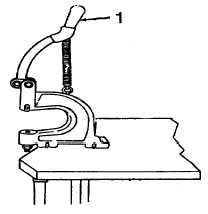
(1)
Raise the hand lever (1) and slip the closed-top button
into the upper die so that the wires on the die fit and
snap firmly over the button edge.
(2)
Drop the tack into the lower die with the tack prong pointed toward the upper die. When using
the double-pronged tack, align the prongs so that when hand lever (1) is depressed, the prongs
will pass freely into the holes in the bottom.
(3)
Place cloth or material over the lower die and the tack.
(4)
Depress the hand lever (1) firmly, clamping the button (that is in the upper die) upon the tack
(that is in the lower die) on the material.
2-99