TM 10-3530-207-14
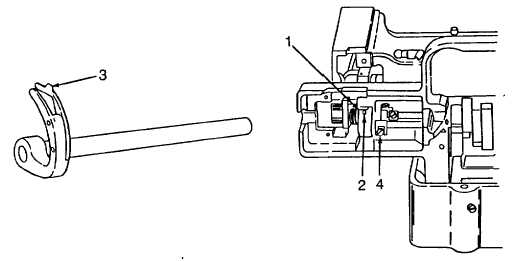
5-46. BUTTON SEWING MACHINE CRANK AND NEEDLE GUIDE WITH SHAFT AND BUSHING -
continued.
Adjustment.
Adjust the needle guide and the finger separately and also adjust ortime them together as a unit.
(1) Adjust the needle guide so that its inside surface just clears the needle. Loosen the setscrew (2) that
holds the needle guide shaft bushing (1), move the bushing enough to make the inside of the guide just
clear the needle, and then tighten the setscrew (2).
(2) Adjust the needle guide thread finger (3) so that the point of the needle on its left-hand downstroke
clears the inside of the finger (3) by about 1/32 inch. Hand-turn the drive pulley until the eye of the
needle
on its left-hand downstroke passes the finger. Loosen the screw (4), turn the needle guide until the
needle
clears the guide by about 1/32 inch, and tighten the screw securely.
(3) Adjust the needle guide and finger (3) together as a unit. Hand-turn the drive pulley until the needle
bar has reached its lowest position and has risen about 13/16 inch. Loosen the screw in the cam on the
looper shaft and then turn the cam until the needle guide starts to move back to the right. Tighten the
screw.
NOTE
The nature of the material to which buttons are to be sewed may make it necessary to vary
slightly from the needle guide and finger adjustment described above.
5-134