TM 10-3530-207-14
2-8.
ASSEMBLY AND PREPARATION FOR USE - continued.
i.
Assembly of Darning Sewing Machine - continued.
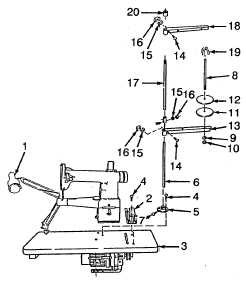
(8) Remove light assembly (1) from box No. 2 and secure to table top (3). Be sure the felt on the
clamp is on the table top and the thumbscrew is on the bottom.
(9) Install bobbin winder (2) to table (3) and secure with two machine screws (4).
(10) Install thread unwinder base (5) to table (3) and secure with three machine screws (4).
(11) Install bottom post (6) to unwinder base (5). Secure by tightening two setscrews (7).
(12) Install two posts (8), two lockwashers (9), two nuts
(10) two pads (11), and two cushions (12) to cone
rest (13).
(13) Install cone rest (13) on bottom post (6). Secure cone
rest (13) with screw (14), lockwasher (15) and nuts
(16).
(14) Install top post (17) to bottom post (6) and secure by
tightening two screws (14), two lockwashers (15) and
nuts (16).
(15) Install thread guide (18) to top post (17). and secure
with screw (14), lockwasher (15) and nut (16).
(16) Install two thread clips (19) on posts (8).
(17) Install rubber cap (20) on top post (17).
2-49


