TM 10-3530-207-14
4-49. BUTTON SEWING MACHINE MAINTENANCE ADJUSTMENT PROCEDURES - continued.
m.
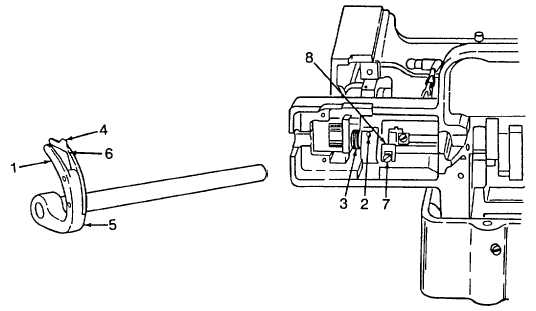
To adjust as a needle guide.
(1)
The front prong (1) is the needle guide and should be adjusted with its inside surface just clearing
the needle.
(2)
To adjust, loosen the set screw (2) which holds the needle guide shaft bushing in which the
needle guide shaft has its bearing. Move this bushing endwise in the desired direction. Then
securely tighten the set screw (2) The needle guide shaft bushing is concealed by the coil spring
(3).
n.
To adjust for thread control.
NOTE
Time the machine before making the following adjustment per paragraph 4-49i.
(1)
The needle guide thread finger (4) which forms the rear prong of the guide (5), is the thread controlling
portion. It should be adjusted so that the point of the needle, on its downward stroke, clears the inside
of the thread finger at (6) by about 1/32 inch when the needle bar is on its left hand vibration, or throw
(2)
To adjust, loosen clamping screw (7) in the needle guide oscillating crank (8). Turn the needle guide
(5) to the required position and securely tighten the screw (7).
NOTE
The above adjustment, to provide a clearance of about 1/32 inch, must be made for each
variation in the distance between the holes in the button.
4-118