TM 10-3510-209-24
2-37. WATER HEATER FUEL PUMP ASSEMBLY (CONT)
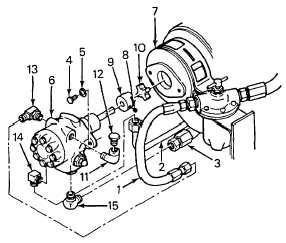
REMOVAL
1.
Disconnect hose (1) from elbow (13).
2.
Disconnect fuel line (2) from elbow (14).
3.
Disconnect hose (3) from elbow (15).
4.
Remove two screws (4), lockwashers (5), and
fuel pump (6) from shutter assembly (7).
5.
Loosen setscrew (8) and remove coupling (9)
and bushing (10) from shaft of fuel pump (6).
6.
Remove elbow (11) from fuel pump (6) and
remove plug (12) from elbow.
7.
Remove elbows (13), (14), and (15) from fuel pump (6).
REPAIR
NOTE
A fuel pump failure may be caused by a clogged strainer or worn or broken parts.
Repair of the fuel pump consists of complete disassembly, cleaning of parts,
inspection, and replacement of kit items as well as other parts that may be
defective.
NOTE
Early units of this laundry may come equipped with a single stage pump (J3BA).
For these units, refer to TM 10-3510-208-34P and TM 10-3510208-34 for
maintenance.
1.
Remove eight screws (16), cover (17), and gasket (18) from fuel pump body (45).
2.
Remove strainer (19) and anti-hum wafer (20) from fuel pump body (45).
3.
Remove five screws (21), end plate assembly (22), spacer plate assembly (23), port housing (24), and gasket
(25) from fuel pump body (45).
4.
Remove seal cap (26), seal cup (27), seal spring (28), seal washer (29), and seal (30) from fuel pump body (45).
5.
Remove shaft assembly (31) from fuel pump body (45).
2-130