TM 10-3510-209-24
3-24. DRYER ASSEMBLY (CONT)
REMOVAL (Cont)
5.
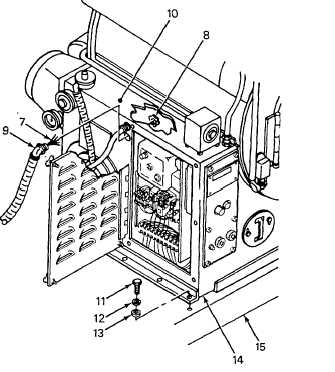
Remove conduit nut (8) from elbow (9) and
wires (7). Remove elbow and wires from control
box (10).
WARNING
Components of the dryer are heavy
and may be awkward to handle. Use
correct
lifting
procedures,
lifting
devices, and/or assistance from other
personnel to avoid injury.
6.
Remove 16 bolts (11), lockwashers (12), flat
washers (13), and dryer (14) from trailer (15).
INSTALLATION
WARNING
Components of the dryer are heavy
and may be awkward to handle. Use
correct lifting procedures, indicated
lifting devices, and/or assistance
from other personnel to avoid injury.
1.
Install dryer (14), 16 bolts (11), flat washers (13),
and lockwashers (12) on trailer (15).
2.
Install wires (7) and elbow (9) in control box (10)
and install conduit nut (8).
3.
Connect wires (7) to terminal board (6) and tighten screws (5). Remove tags.
4.
Install plastic wire ties (Item 11, App C) as required.
5.
Install cover plate (4) and three screws (3).
6.
Close control panel door (2) and tighten three screws (1).
NOTE
FOLLOW-ON MAINTENANCE:
Install platform (TM 10-3510-209-10).
Install left beam (para 2-15).
Install tarp assembly (TM 10-3510-209-10).
3-113


